
In the previous episode, we put our finger on something simple but crucial: a cockpit doesn’t need to be “loaded,” it needs to be clear. The P1 SIM Eau Rouge Apex wheel and the DNR plugin brought what’s often missing in sim racing: clean readability, a hierarchy of information, and above all the ability to make a decision without taking your eyes off the road.
From there, the next step is logical: if you can read, you can act. And if you can act quickly, you can handle what modern Hypercars demand from every driver: a car that isn’t driven only “on grip,” but also on energy.
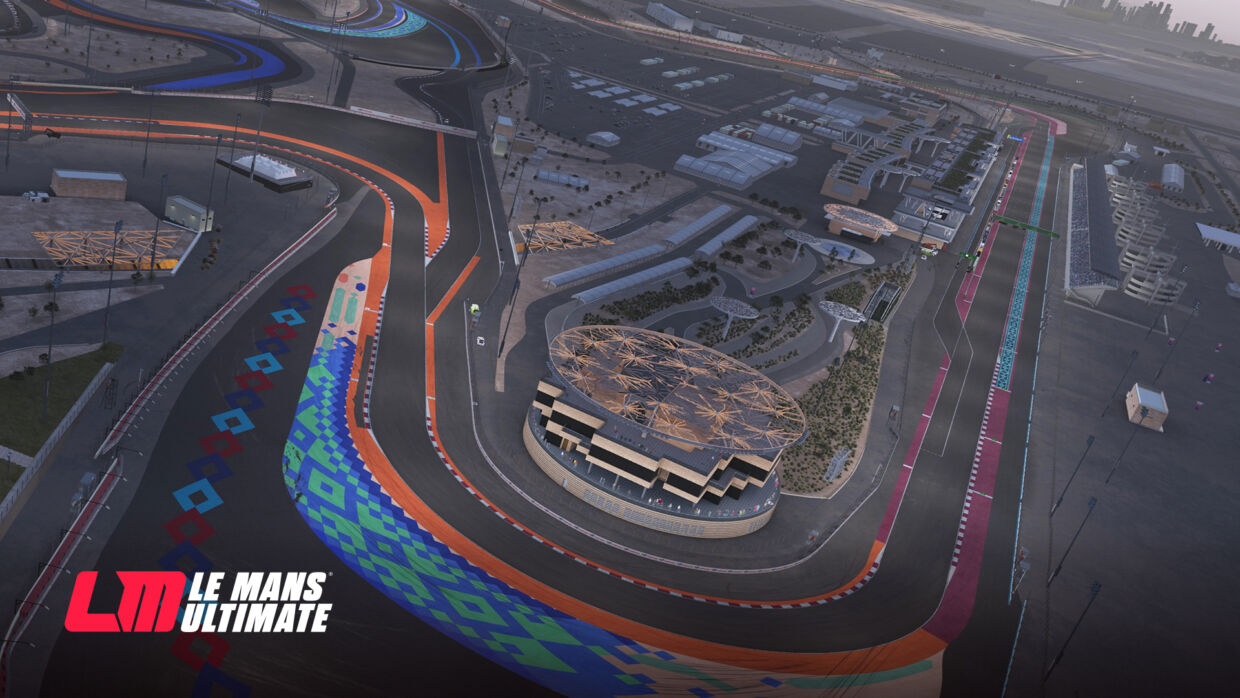
Lusail: the circuit that forces you to stop “driving” and start “managing”
Our objective is still the same: Qatar, the opening round of the 2026 WEC championship.
This circuit is treacherous because it looks simple. Big sweepers, long loaded corners, powerful braking zones, strong traction phases… and a rhythm that gives you the illusion that “it just works.” Except the truth shows up after a few laps: if your energy is poorly managed, the 9X8 subtly changes character. Not a breakdown, not a disaster. Just that little moment where you think, “huh… it accelerates less… it feels flatter… I need to push.” And when you start pushing, you lose cleanliness. When you lose cleanliness, you lose time. And endurance racing is exactly that: a slow accumulation of small costs.
In Hypercar, consistency isn’t only about line choice. It’s also about windows: which phases of the lap deserve to be “boosted,” which ones must be secured, and how to keep a reserve for the moment the race asks you to attack (traffic, overtakes, defending, restart after a neutralization).
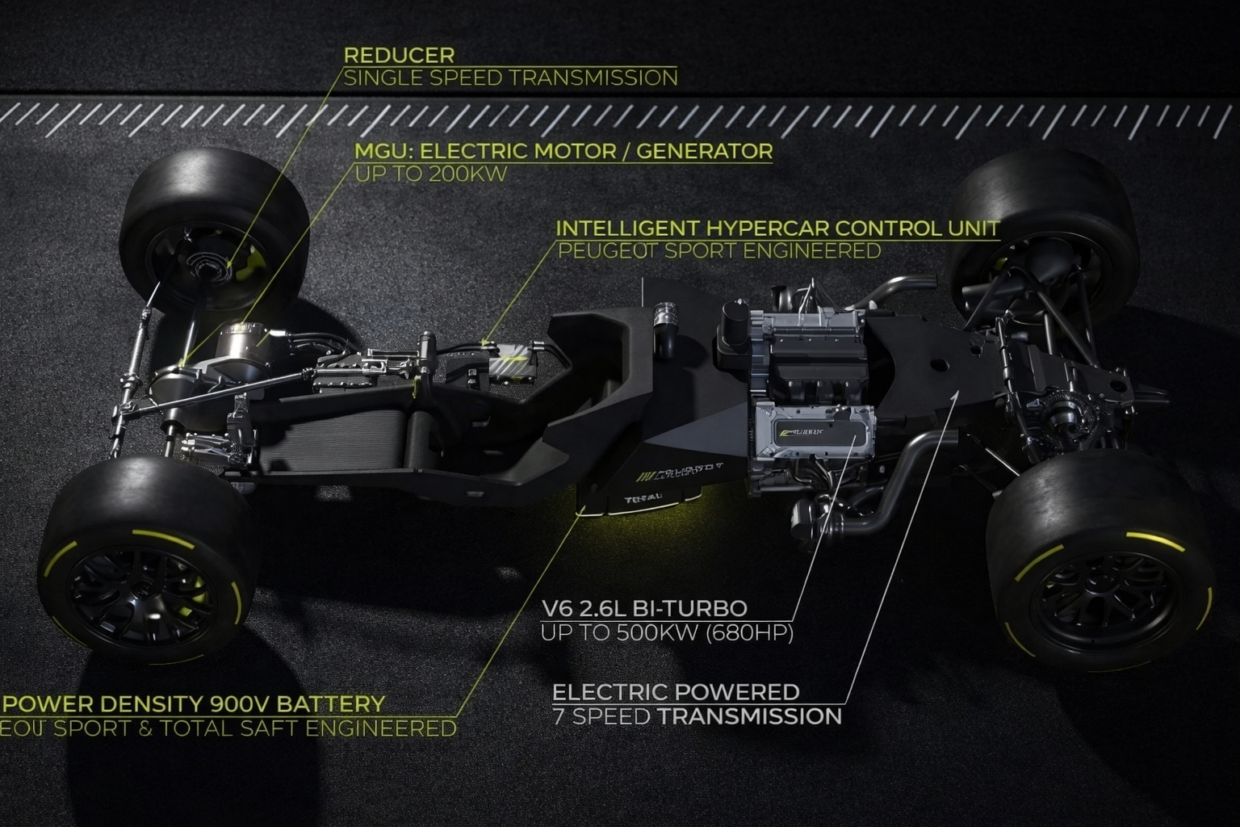
Deployment (0 to 200 kW): a power setting… but above all a behavior setting
In Le Mans Ultimate, the Peugeot 9X8 offers a hybrid deployment setting from 0 to 200 kW, with a typically “neutral” value around 100 kW when leaving the pits. On paper, it’s just a quantity of electrical power authorized on acceleration. In real life—so, on track—it’s more interesting: this setting influences how the car “responds” when you get back on the throttle.
Low deployment: smoother relaunches, a gentler car, sometimes more “manageable” in traffic or when grip isn’t perfect.
High deployment: more torque earlier, a stronger relaunch, and therefore more potential performance… as long as you’re clean, because free torque also amplifies mistakes.
The key point: it’s not a “fast / not fast” button. It’s a “demanding / stable” button. And in endurance, “demanding” quickly becomes expensive if you leave it cranked all the time. It’s even more interesting when the cockpit position has been set correctly. As you’ve probably noticed, the first article was updated on that topic. Mechanical grip changes radically. And that’s even more true with the 9X8’s energy deployment.
Why “full blast” is a bad idea (and how it makes you lose time)
We all have that reflex: “if I’ve got 200 kW, I’ll take 200 kW.” Except you’re not driving a single isolated setting—you’re driving an energy economy.
When you stay too high for too long, three things happen, and they always happen together:
You consume your stock at the wrong time
You spend energy when you don’t truly need it (clear track, neutral phase, tire management), and you end up lacking it when you need it strategically (overtake, defending, key corner exit).
The car becomes more “sensitive” on throttle application
More torque means more responsibility. A touch of throttle too early, steering still loaded, and you trigger a correction. A correction = time lost, tire wear, and often a less clean line into the next corner. Since the latest update released by Studio 397, in the rain it’s a real adventure.
You lose control of your race windows
Endurance driving is about choosing when you attack. If your energy goes out “on autopilot,” you’re not choosing anymore—you’re reacting.
That’s where the DNR HUD really matters: monitoring SOC (State Of Charge) isn’t a gadget. It’s a way to avoid driving “by feel” a parameter you can’t always feel immediately.
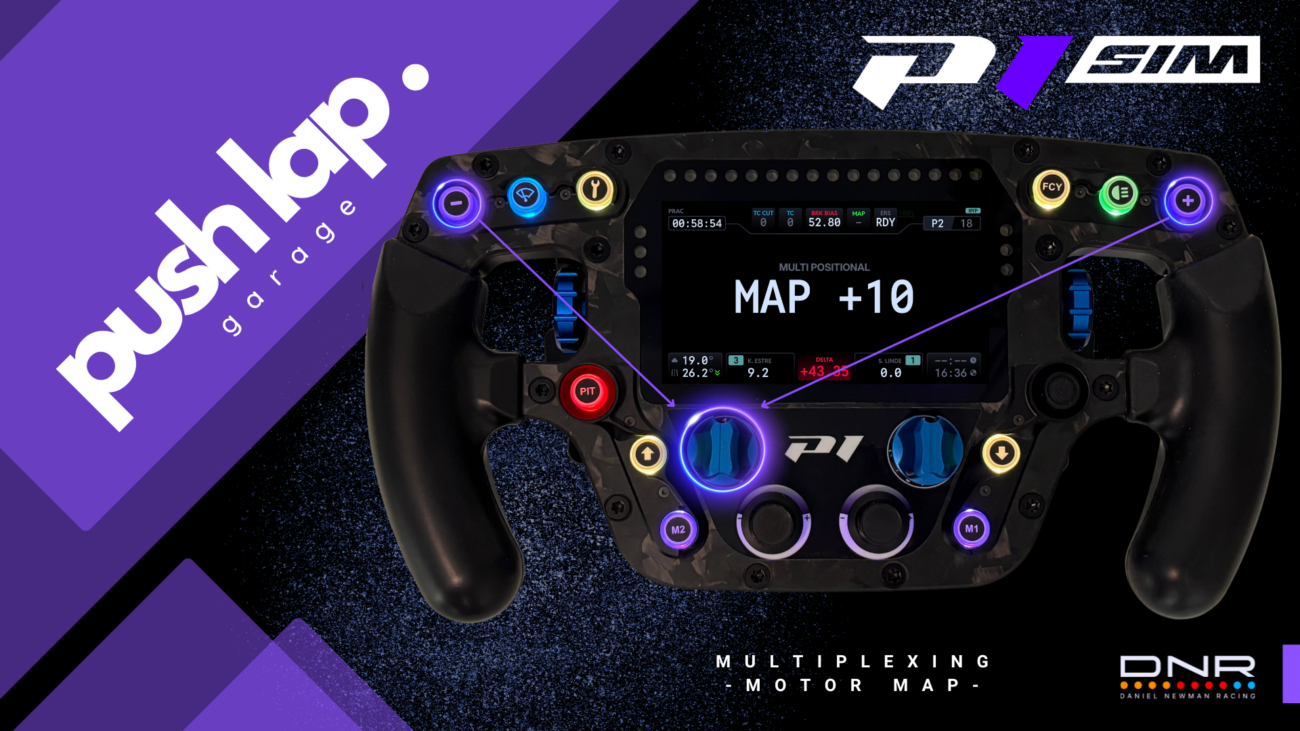
Multiplexing: turning your wheel into a strategy console, without a complicated mess
This is where the Eau Rouge Apex wheel and the DNR logic become powerful. Multiplexing isn’t about “making things complicated.” It’s the opposite: making things simple so you can use it smoothly in a race.
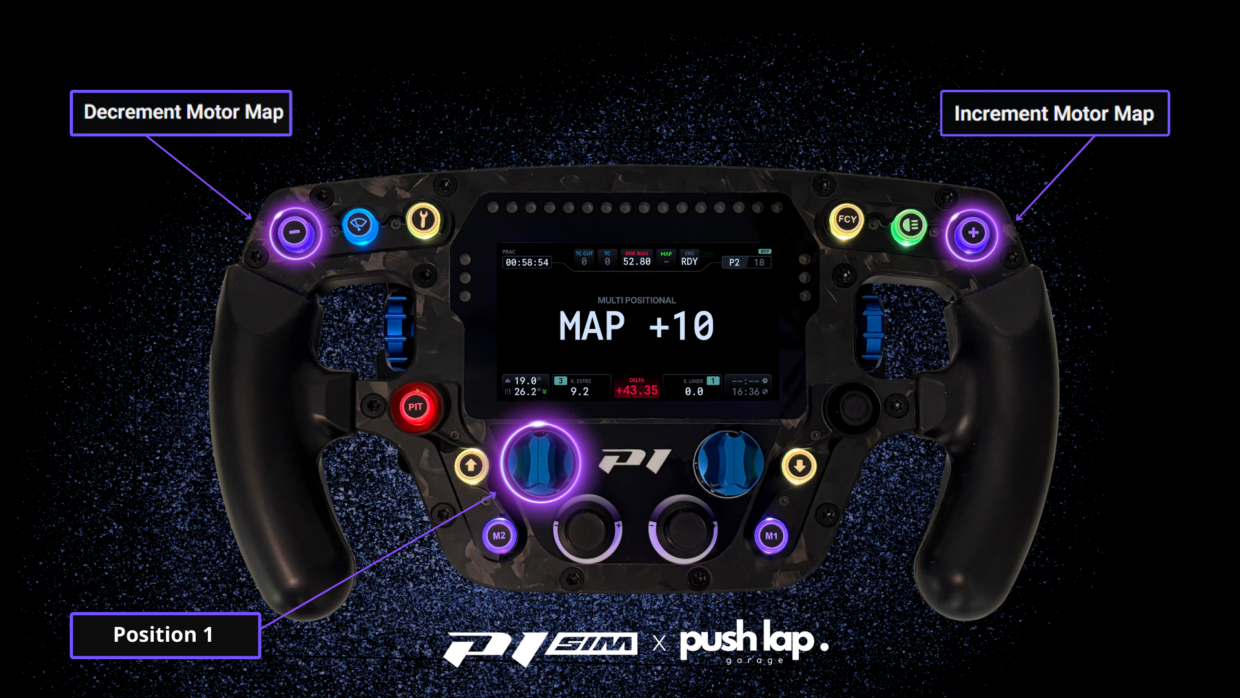
The recipe is elegant: a multi-position rotary + two buttons (+ and –).
Each rotary position defines a “theme”: at that position, your + and – buttons are no longer “two buttons among twenty,” but two dedicated actions.
In practice, it gives you a modern race-car ergonomics:
You switch “modules” with the rotary, in this case POS 1 (MOTOR MAP)
you adjust with + / – like on a real WEC wheel, and above all… you drastically reduce the risk of pressing the wrong thing at the worst possible moment.
Multiplexing is meant to make the action obvious, not to make the cockpit impressive.
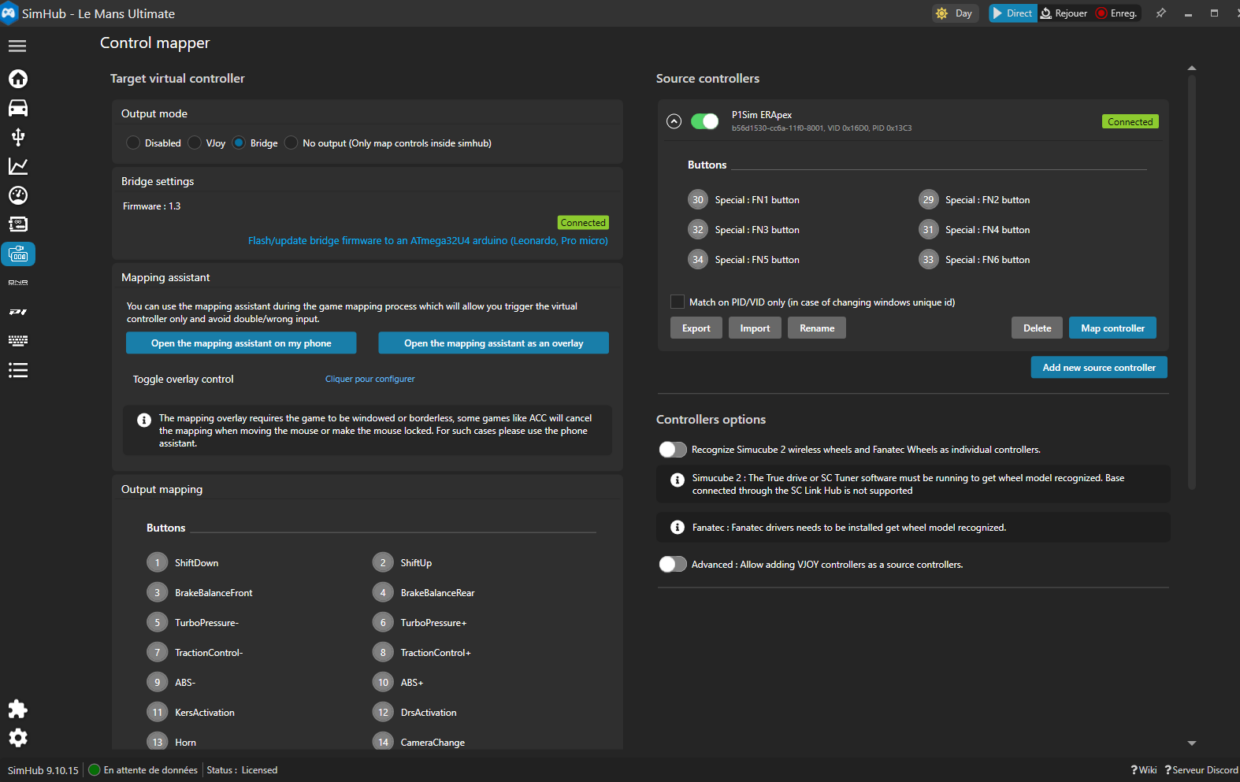
From theory to cockpit: how SimHub makes multiplexing usable
At this stage, we have the “why” and the “what.” Now we need the “how,” because multiplexing only has value if it’s stable: 1 click = 1 action, and definitely not a lottery depending on the mood of the game or the peripherals.
SimHub plays a middleware role here (yes, it’s a geek word, but the idea is simple): it takes the wheel inputs, normalizes them, re-routes them, and presents them to the game cleanly.
The result: you build an architecture where LMU receives coherent commands, and where DNR can display labels that match reality.
Bridge: the “clean” version of the pipeline
At this stage, stability matters more than features: multiplexing is only valuable if one press = one action, every single time. And that’s exactly where the Bridge “USB key” changes the game.
The P1 SIM Eau Rouge Apex is designed like a modern race wheel: a multi-position rotary, encoders, +/– buttons, and—most importantly—a context-driven control philosophy. In sim racing, the limitation is rarely the wheel itself… it’s the chain between the wheel and the game. When multiple devices and software layers overlap, unwanted behavior can appear (double inputs, drifting button IDs, commands interpreted differently depending on the path they take). The result: a very powerful wheel, but not yet fully “race-usable.”
The Bridge key is there to bring order. It allows SimHub to establish a dedicated output: the wheel remains the source(your inputs), SimHub becomes the layer that organizes and structures everything (multiplexing, FN, positions), and LMU then receives a more coherent and predictable signal.
In practice, this unlocks exactly what you want from the Eau Rouge Apex:
rotary positions that become true “modes” (Motor Map today, regeneration tomorrow),
+ / – buttons that behave like reliable adjusters, with no drift and no “surprises” while driving,
a clearer and safer cockpit, because you reduce the risk of errors at the worst possible moment (braking, restarts, traffic).
Getting started
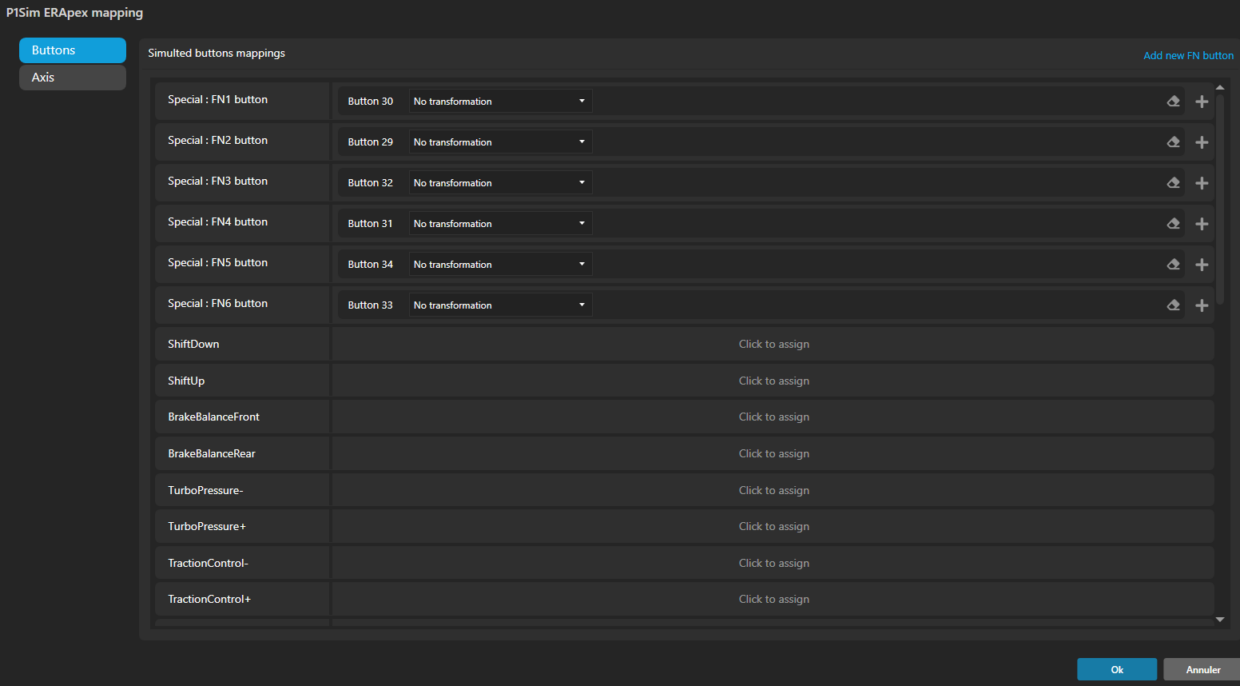
The goal isn’t to “map everything” quickly. The goal is to build a clean, repeatable chain: when you act on the wheel, LMU must receive a single, clear instruction—always the same. To achieve that, the logic inside SimHub must stay simple: the Eau Rouge Apex should be treated as the primary source for everything related to multiplexing. The more you mix devices inside the same logic, the more you create overlapping events—and, inevitably, inconsistent behavior.
The next key point is securing the foundation of multiplexing: FN (FN1/FN2…). These are not “extra buttons”—they are context markers. They define which “theme” you are in depending on the rotary position, and therefore which function your +/– buttons are supposed to control. If FN events are not clean and stable, multiplexing will never be reliable, no matter what you do later.
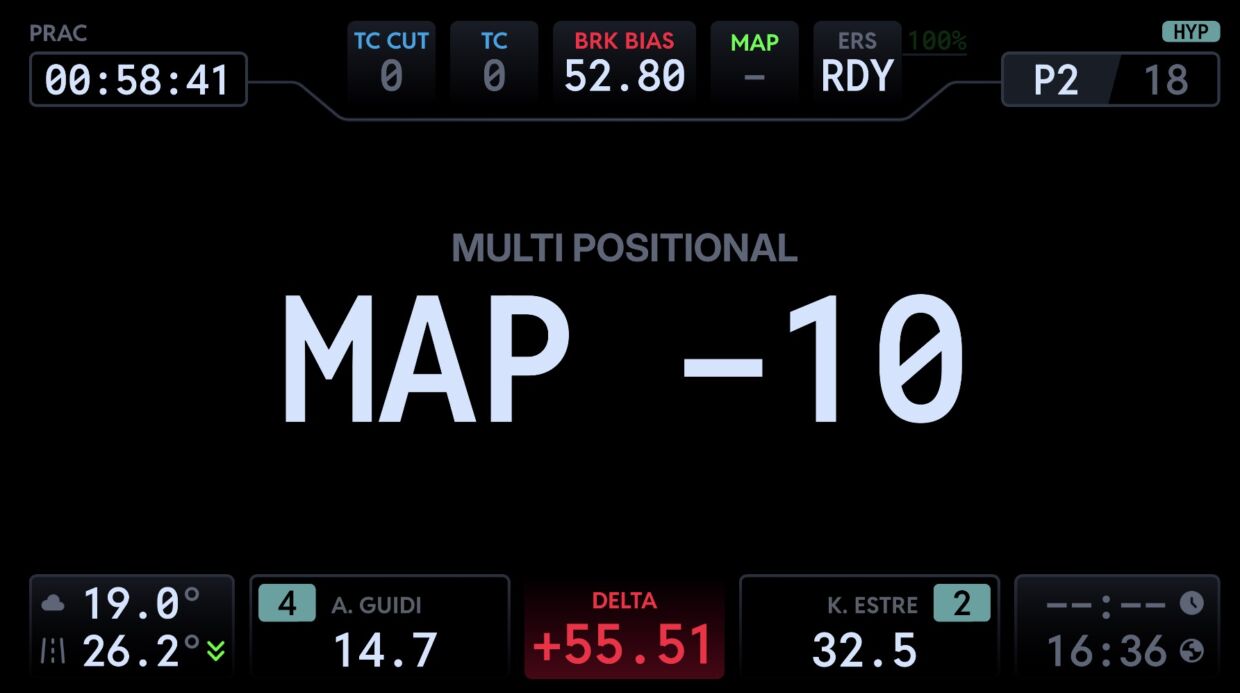
And in this workflow, one thing matters even more: FN inputs are also essential for the DNR plugin. They are what allows the correct information to be displayed directly on the wheel screen, at the right time, in the right context. Concretely, this is what makes clear labels such as “MAP +10” and “MAP -10” possible: you’re no longer adjusting settings “blind,” you immediately see what you are changing, and you reduce mental load on track.
Once these foundations are solid (single source + stable FN), you can map a first simple function to the +/– buttons (for example Motor Map), confirm the command behaves consistently, and only then start stacking additional controls. The intended outcome is very practical: you should be able to adjust a parameter while driving without thinking, exactly like in WEC—rotary selects the theme, +/– adjusts, and the whole system remains perfectly predictable.
For those who prefer to see this configuration in action rather than only reading it, two videos will be available at the end of this article. Dan Suzuki provides a very clear reference for the English-speaking community, while Arsouille GPoffers an equivalent step-by-step approach in French—ideal to follow along and validate the setup.
DNR: multi-position labels are what removes hesitation
DNR isn’t there to “look pretty.”
It’s there to reduce mental load: for each position, you know what + and – do.
That’s what turns multiplexing into a racing tool: you don’t think—you execute.
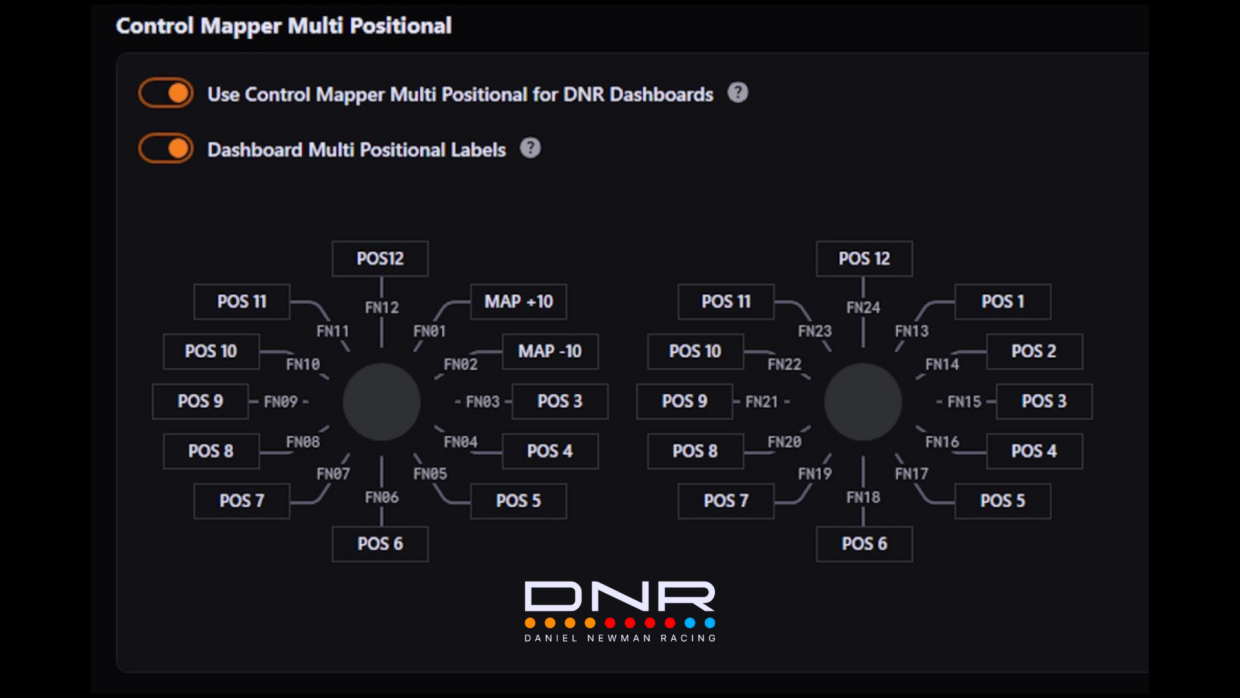
That gives us a multitude of possibilities, which we’ll explore soon.
In LMU: assign Motor Map controls properly
Now that we have a clean and efficient SimHub chain, all that’s left is to assign the controls inside the simulation.
You assign the button intended for “+” to Increment, and the button intended for “–” to Decrement.
On track or in the garage:

You press “+” once → the Motor Map goes up by one step.
You press “–” once → it goes down by one step.
Motor Map: the most “profitable” adjustment to drive in Qatar
For an episode focused on energy management, starting with Motor Map makes sense: it’s the setting that allows you to modulate deployment “on demand,” without going into a maze of menus, and without losing the thread of your driving. Now that we have a solid base, all that’s left is to understand how to deploy energy on track in an optimal way.
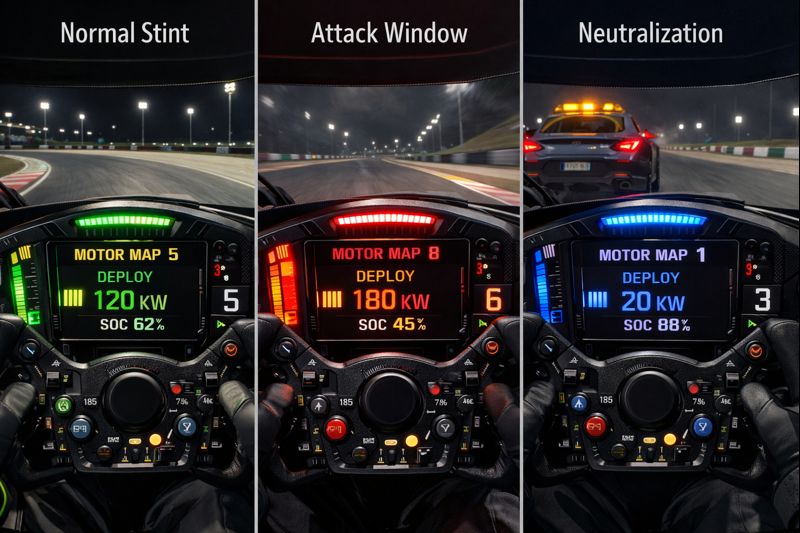
The point is that in a race you don’t need 18 strategies. You need 3 simple modes, and the ability to switch between them quickly:
“stint” mode (stable base): a mid value that gives you pace without draining your SOC.
“attack” mode (1–2 laps): you raise it to create an overtaking or defending window.
“economy / neutralization” mode: you lower it to preserve your stock and keep the car smoother in slow phases.
Applied correctly, this trio often does more for your total race time than a perfect setup. Small spoiler: this approach will be extremely useful for applying certain modes to the M1 and M2 buttons.
A simple (and realistic) method to be fast without burning through energy
You can sum up the management logic in one pit-wall engineer rule: you spend energy when it creates an advantage, not when it flatters acceleration.
Normal stint
Stay in a mid zone (typically around 110–130 kW).
Objective: consistency, tires, and avoiding SOC rollercoasters.
Attack window
Go high (160–190 kW) for 1 or 2 laps.
Objective: create a real delta on corner exit, complete an overtake, or defend on a restart.
Neutralization / Safety Car / slow traffic
Go low (0–50 kW).
Objective: preserve your stock and avoid an overly “abrupt” car while driving accordion-style.
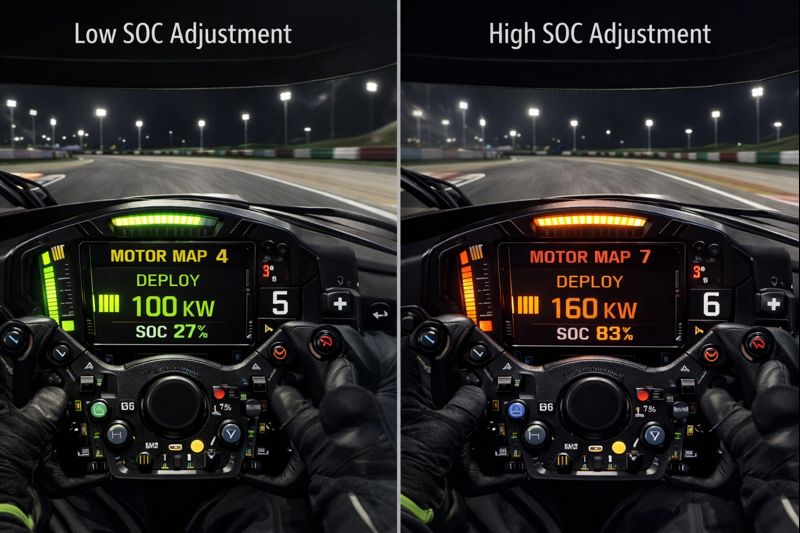
“Smart” adjustment
Low SOC: stabilize by lowering (80–100 kW) to avoid a drop.
High SOC: you can afford to spend a bit more (140–160 kW) instead of “over-stocking” unnecessarily.
It’s simple, repeatable, and above all: usable in a race without turning you into an accountant.
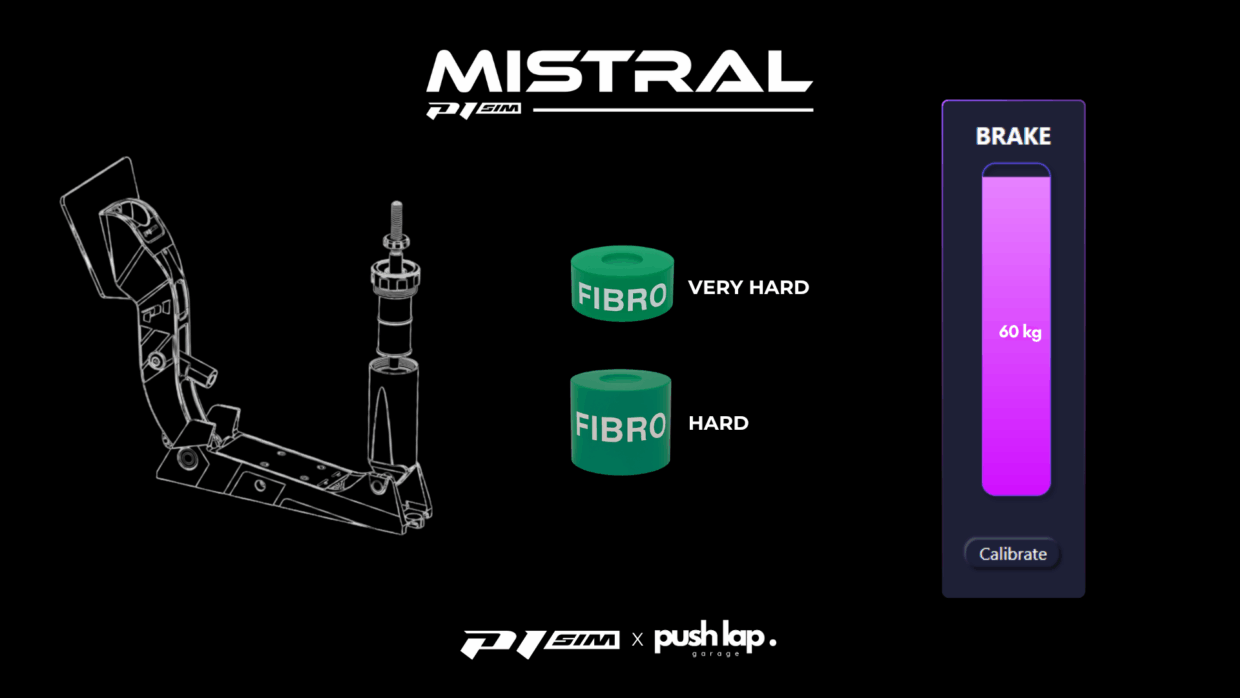
P1 SIM Mistral: the brake pedal as an “energy sensor”, not just a deceleration switch
In a WEC-2026 mindset, the wheel (multiplexing) drives the strategy… but the P1 SIM Mistral drives the reality. In a Hypercar like the 9X8, braking is not only about slowing down: it’s where you stabilize the car, shape entry speed, and—most importantly—where you directly influence the quality of your energy management (SOC and recovery). That’s exactly why the P1 SIM curve in SimHub becomes a strategic lever: it lets you tailor brake response to your force, your modulation style, and the hybrid’s demands, instead of living with a generic response that’s either too abrupt or too linear.
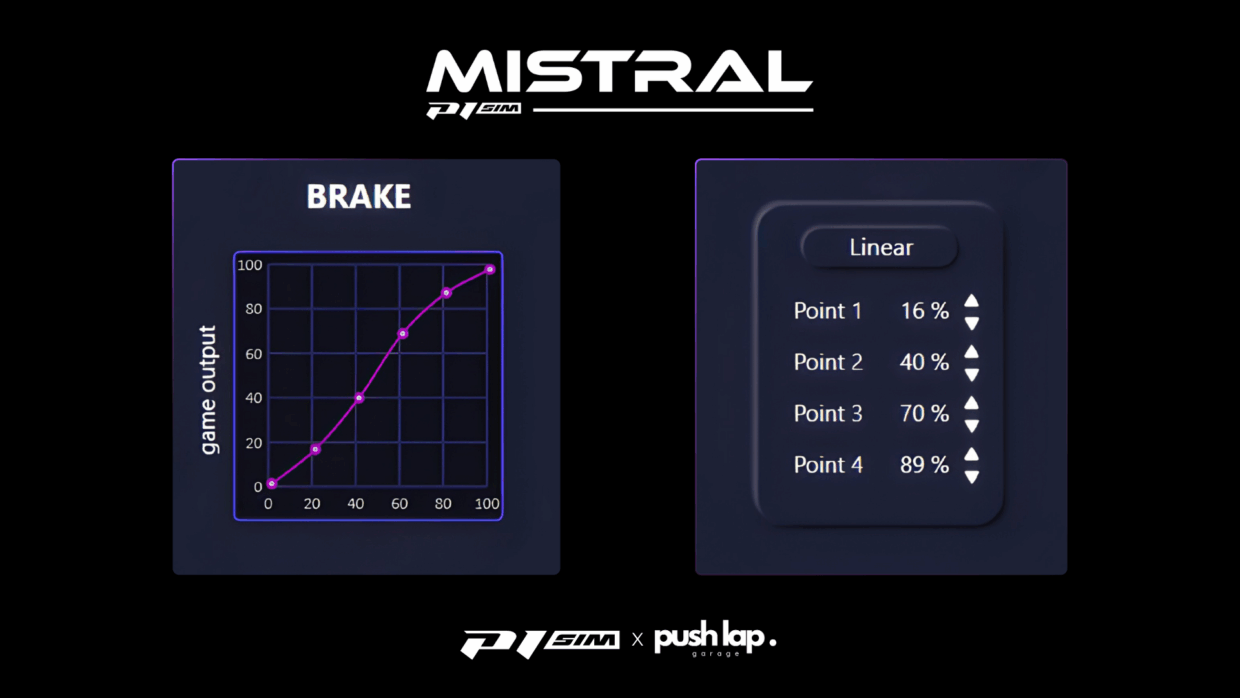
A custom curve delivers three concrete benefits. First, it smooths the initial zone to avoid involuntary micro-brake inputs—the kind that disturb stability and can trigger “parasitic” regeneration or overload the entry. Second, it makes the mid-range more progressive and readable, which improves trail braking and pressure repeatability—essential for holding a consistent deployment strategy across an entire stint without rhythm drift. Third, it provides a more controlled ramp to high pressures, so you can hit your peak braking points consistently without having to stamp the pedal like you’re trying to delete the pedal set (even though the Mistral is clearly built for serious load).
In the end, the curve isn’t comfort—it’s calibration. It aligns your input (foot force) with the on-track outcome you actually need (pressure, stability, recovery). And that’s what turns the 9X8’s energy management into something you can genuinely exploit: the wheel selects the mode, but the pedal ensures the car enters the corner the same way… lap after lap.
Conclusion — the real luxury isn’t power: it’s control votre titre ici
This episode isn’t about “settings to look good.” It’s about something very concrete: how to drive in Qatar with a 9X8 that stays the same car from lap 1 to lap 18 of a stint. And that comes down to one central idea: you’re not only driving a line—you’re driving a resource.
Multiplexing on the P1 SIM wheel, paired with DNR, gives you modern ergonomics: you change context, you adjust quickly, you stay focused on the track thanks to the display that gives you the right information at the right time.
Because after deployment, the most interesting piece remains: regeneration. There, we’re no longer talking only about “how much I give,” but “how I recover”—and in a Hypercar, recovery is often the difference between a clean, efficient stint and one where you wonder why the car no longer does what it was doing ten minutes earlier.
We are opening the first page of a long process that will build a solid foundation for our objective.
Leave a Comment